If you hover over the tools in the toolbar, the name and shortcut will be displayed. These shortcuts come in handy; I suggest you learn them as quickly as possible. Most of them are intuitive, like T for text. Some tools have a small black arrow in the bottom right corner. This indicates that other tools are grouped with this tool. Click and hold to view the other tools. Some tools have settings that can be changed. Double click the tool in the toolbar to change these settings.
Selection tools
Selection tool (V)
* Selects whole objects and groups of objects
* Moves objects and groups of objects
* Resizes and rotates (hold down shift to constrain proportions)
* Shift+click to add other objects to your selection
* Draw a marquee to select any objects that the marquee touches
--If an object doesn’t select, it’s probably locked; unlock it in the layers palette
--Make sure you click on the stroke of an object that has no fill. This applies to groups of objects that have no fill as well. You must click on a stroke.
--If you hold Option (alt) while you’re dragging an object you’ve selected with the selection tool, it will create a copy of the object and leave the original.
Direct Selection tool (A)
* Selects anchor points of objects
* Moves and edits anchor points and handles (curves)
* Can select solid objects in a group (see Group Selection tool)
Group Selection tool
* Selects one item in a group
Lasso tool (Q)
* Selects anchor points that you have drawn around
Magic Wand (Y)
* Selects objects with similar fill attributes
--The Magic Wand is customizable. Double click on it in the toolbar to change its settings according to your preference.
--NOTE: Use this when you want to swap out a color in your document.
SELECT
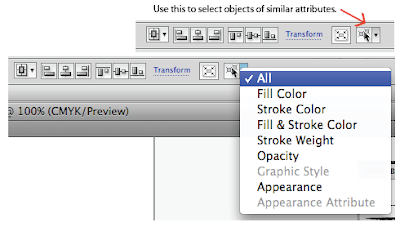
If the selection tools we’ve discussed don’t give you the selection control you’re looking for, try looking under Select. I often use this. Choose Select > Same > [whatever you’re trying to select]. Note that in this menu, you can also save selections. These selections are saved independently of groups. If you know that you’ll be selecting the same items several times as you’re working on a document, you might consider saving your selection. Additionally, as of CS4, this menu option appears in the control panel automatically when an object is selected.
 Type Tools
Type tool (T)
* Click and type to create a line of text. When you select this text and transform it, the text will rescale, rotate, etc. Use this for short bits of text (1-2 words).
* Click and drag, then type. When you select this text box and transform it, the box will change size and orientation but the text will not; text will reflow. Use this for sentences and paragraphs.
Type Area tool
* Allows you to type inside an object; the text follows the shape of the object.
--The Type Area tool automatically appears if you have the type tool selected and you hover over an object. Note that the object containing the text cannot be colored independently of the text.
Type on a Path tool
* Types on an open path
--The Type on a Path tool automatically appears if you have the type tool selected and you hover at the beginning of a path. Note that the stroke of the path will disappear; the path contains only text.
Vertical Type tools
* These three are the same as the three tools we’ve just discussed, but characters stack vertically.
Drawing tools
Pen tool (P)
* Draws and makes curves; this is a good option to give your object a smooth shape. You use it by setting anchor points and defining the curves. Illustrator fills in the lines between the anchor points.
* Adds or deletes anchor points to/from any path; converts anchor points from corner to curved or vice versa
* Continues any open path; closes any open paths
--Please see separate section dedicated to the pen tool.
Paintbrush tool (B)
* This tool applies a paintbrush immediately to the path that you draw, but a paintbrush can be added to any path.
--You can create your own paintbrushes.
Pencil tool (N)
--Draws open or closed paths
--Double-click the tool to edit the settings of the pencil tool to best reflect the type of path you’d like to create. (See “Pencil Tool Options” in Illustrator help for information on the different settings.)
--Hold down option (alt) as you’re drawing to create a closed path (a circle will appear beside the icon).
--The pencil tool has this weird feature of redrawing lines after you’ve drawn something. Be very careful as you’re drawing to not draw a new line too near a selected line; otherwise you will redraw the selected line. To make sure you won’t be redrawing lines, make sure that the X symbol appears beside the pencil cursor before you start to draw a new line, or make sure that no lines are selected when you draw your new line.
Smooth tool
--Smoothens selected paths. Sometimes you’re not happy with the result of your drawn line; try using the smooth tool to smooth it out a little. You can control its settings by double-clicking it.
--You can access this while you’re using the pencil tool by holding down the option (alt) key.
Path eraser tool
--Use this to erase segments from a selected path
Line and Shape Tools
Note: With the following tools (lines and shapes), you can hold the space bar to reposition your object as you are creating it. Most of these tools can be double-clicked to reveal more options. Also, instead of clicking and dragging to create the objects, you can click once and fill in the information if you want to create an object that is mathematically precise.
Line Segment tool (\)
* Draws straight lines (hold shift to constrain lines to 45 degree angles)
--Edit the coordinates of the line in the X and Y coordinate fields in the Control palette or transform palette
Arc tool
* Bonus points if you use this. I never have. But if you want a line segment with a curve, feel free to use this.
Spiral tool
* Creates a spiral
--Use the command key to control the shape of your spiral.
--Use the up and down cursor keys to add or delete segments from your spiral.
Rectangular Grid tool
* Creates a rectangular grid
--Use the cursor keys to add or delete lines from your grid
--If you want to constrain proportions, it’s hard to hold the shift key while you’re adding or deleting lines from your grid; you don’t have to. Get the number of lines you want, then hold shift and the proportions will be constrained.
Polar Grid tool
* Creates a polar grid
--Use the cursor keys to add or delete lines from your grid
--If you want to constrain proportions, it’s hard to hold the shift key while you’re adding or deleting lines from your grid; you don’t have to. Get the number of lines you want, then hold shift and the proportions will be constrained.
--If you delete all the radial dividers, this is a great way to create concentric circles.
* Rectangle (M)
* Rounded Rectangle
* Ellipse (L)
* Polygon
* Star
* Flare
--These tools all have similar features. Each can be clicked and dragged, or you can click and enter in precise measurements. The star, polygon, and flare can be manipulated using the cursor keys and command key (similar to the grids and spiral that we’ve already discussed). The flare tool creates a solar flare only when used on top of another colored object (doesn't work on white).
--These shapes can be added to each other and any other shapes by using the Pathfinder palette. (Window, Pathfinder)
Eraser tool (Shift + E)
--Erases shapes and paths that you don’t need. This is great for cleaning things up. Resize the brush using the bracket [ ] keys.
--Double click the tool to change its options.
--NOTE: end result is a closed, finished object
Scissors tool (C)
* Cuts a portion of a path—use this on the stroke
--NOTE: end result is an open path
Knife tool
* Cuts through an object, separating it into two closed objects.
--NOTE: end result is a closed, finished object
Transform and Warp tools
In Illustrator, “Transform” simply means to change an object’s size, rotation, etc.
Rotate (R)
--This rotates a selected object around a specified axis. Click once to set the axis, then drag to watch your object rotate. (Hint: When dragging, you don't need to drag the actual object; just drag anywhere on the artboard and watch your object rotate!)
--Hold shift to keep rotation to 45 degree angles.
--Hold option (alt) to make a copy of your original item.
--Double click the tool to set a precise rotation. Or hit "enter" when an object is selected and the rotate tool is chosen.
--Items can be rotated when selected with the Selection tool. When the cursor hovers around the points of the bounding box, a rotation icon appears and the item may be rotated around a center axis.
Reflect (O)
--This reflects (flips) a selected object around a specified axis. Click once to set the axis, then drag to watch your object reflect and rotate.
--Hold shift to keep reflection to 45 degree angles.
--Hold option (alt) to make a copy of your original item.
--Double click the tool to set a precise reflection.
Reshape tool
--This works on open paths. You can select an end point and move it; the rest of your path will reshape accordingly. This can be contrasted with the Direct Selection tool, which would move only the anchor point that you’ve selected and not reshape the entire path.
Warp tools
--Each of these tools may be double-clicked to yield more options. I often find these tools a little too powerful to do what I want them to do, but they come in handy sometimes. Play around with them until you’re comfortable, and be creative to find uses for them! Use them on selected paths and objects.
Free Transform tool
--There is little that this tool can do that the normal selection tool can’t. Here’s the one extra capability that I’ve discovered: Grab a corner of your bounding box and hold down shift, option, command (shift, alt, control) while you drag. This will change the perspective of your object. (Note: You must grab the corner of the bounding box and then hold shift, option, command. Otherwise it won’t work.)
We won’t be going over the graph tools, symbol tools, mesh tool, gradient tool, or blend tool in this course. Use Illustrator Help if you ever need to use them.
Eyedropper tool (I)
--The eyedropper tool copies the fill and stroke properties from one object to the selected object. You may even click the eyedropper to copy the properties from a locked object.
Live Paint Bucket (K)
--Allows you to fill live paint objects with a color
Live Paint Selection Tool
--I’ve never found a practical use for this… I just use the Live Paint Bucket
Artboard Tool
--Allows you to create new artboards and edit existing artboards
Slice Tool
--Allows you to slice image for web use
Hand Tool (H)
--Allows you to "grab" and move the artboard. (Accessible always by holding down space bar.)


